
What is the best way to prepare garden beds for spring? The best way to prepare garden beds for spring is to start by cleaning them, assessing their health, and then amending the soil to provide a nutrient-rich environment for your plants.
As winter’s chill finally loosens its grip, the urge to get back into the garden becomes almost unbearable for many. But before you plunge your hands into the warm earth, a little bit of preparation goes a long way. Properly prepping your garden beds for spring ensures a thriving, productive growing season. This guide will walk you through the essential steps, from initial cleanup to nutrient enrichment, making sure your plants get the best start possible.
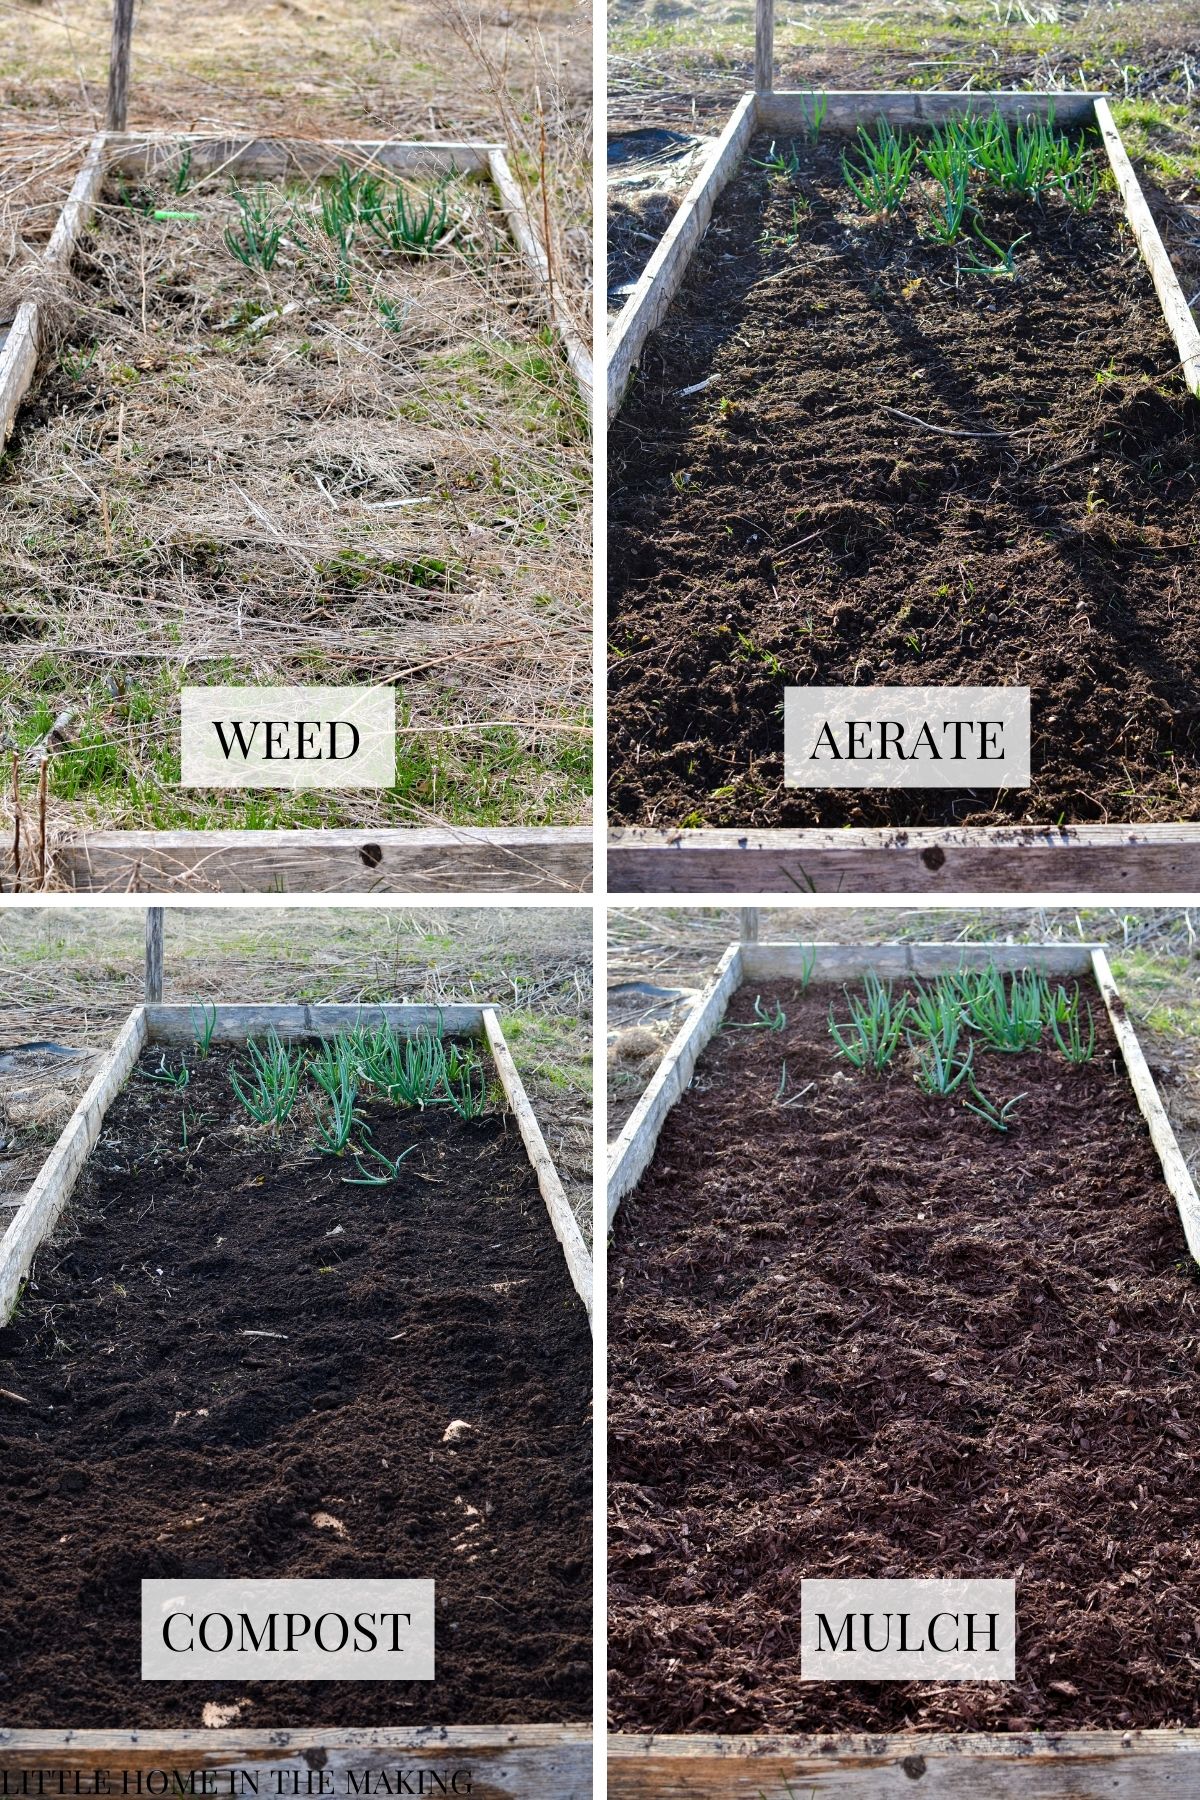
Image Source: www.littlehomeinthemaking.com
Clearing the Winter Debris
The first order of business is to tackle the remnants of winter. Snow, fallen leaves, and any leftover plant debris need to be cleared away. This not only tidies up your garden but also removes potential hiding spots for pests and diseases.
Removing Weeds
Winter can be surprisingly active for weeds, especially in milder climates. Those pesky invaders that managed to get a foothold before the frost will be eager to resume growth as soon as the soil warms.
- Hand-pulling: For smaller beds, hand-pulling is an effective method. Try to pull weeds when the soil is slightly moist, as this makes it easier to extract the entire root system.
- Hoeing: A sharp hoe can slice through young weeds with ease. This is particularly useful for larger areas and can be done before significant growth occurs.
- Mulch Removal: If you mulched heavily over winter, carefully remove the mulch. This allows the soil to warm up more quickly and makes it easier to spot and remove any overwintering weeds. Be mindful of beneficial overwintering insects that might be sheltering in the mulch; if possible, move it to a temporary pile and return it later.
Clearing Old Plant Material
Any dead plants or spent crops from the previous season should be removed. This prevents the spread of diseases that may have affected those plants. Diseased plant material should ideally be bagged and disposed of in your household waste, not composted. Healthy plant debris, however, can be added to your compost bin.
Assessing Your Soil’s Needs
Once your beds are clear, it’s time to take a closer look at your soil. Its condition dictates the type and amount of preparation needed.
Soil Testing
- Why Test? Soil testing is crucial for identifying nutrient deficiencies, pH imbalances, and even potential contaminants. It provides a scientific basis for soil amendment, ensuring you add only what your garden needs. Over-fertilizing can be just as detrimental as under-fertilizing, leading to weak growth or nutrient burn.
- How to Test: You can purchase home soil testing kits from garden centers. These kits typically test for pH, nitrogen (N), phosphorus (P), and potassium (K). For a more comprehensive analysis, including micronutrients and organic matter content, you can send a sample to your local cooperative extension office or a private soil testing lab.
- Interpreting Results: The test results will provide recommendations for soil amendment based on your specific needs. Pay close attention to the pH level, as it affects nutrient availability. Most vegetables thrive in a slightly acidic to neutral pH range (6.0-7.0).
Observing Soil Structure and Drainage
Healthy garden soil has a crumbly texture, allowing for good aeration and water penetration.
- The Squeeze Test: Grab a handful of soil and squeeze it. If it forms a tight, sticky ball that doesn’t crumble when poked, it likely has too much clay. If it falls apart immediately, it might be too sandy. The ideal soil will hold its shape briefly but crumble easily.
- Drainage Improvements: Poor drainage can suffocate plant roots. If your beds remain waterlogged for long periods after rain, you’ll need to address drainage improvements. This might involve incorporating organic matter, tilling garden beds to break up compaction, or even considering raised beds.
Preparing Soil for Planting
This is where the real work begins to create a welcoming environment for your plants.
Tilling Garden Beds (Optional but Often Beneficial)
- The Purpose of Tilling: Tilling garden beds can help break up compacted soil, improve aeration, and incorporate amendments. It can also help mix in cover crops or buried organic matter.
- When to Till: Till when the soil is moist but not wet. If it’s too wet, you risk destroying its structure and creating clods. If it’s too dry, it will be difficult to work.
- How to Till: You can use a shovel, garden fork, or a tiller machine. A garden fork is excellent for loosening soil without excessively disturbing its structure. If you opt for mechanical tilling, avoid over-tilling, which can break down beneficial soil aggregates and harm earthworms.
- No-Till Options: Increasingly, gardeners are adopting no-till methods to preserve soil structure and the delicate ecosystem of beneficial microorganisms. If you’re going no-till, you’ll focus more on surface applications of amendments and mulch.
Adding Soil Amendments
This is the most critical step in enriching your garden soil. Soil amendment refers to adding materials to improve the physical properties, structure, and fertility of the soil.
Organic Compost: The Gardener’s Gold
- Why Compost? Organic compost is a powerhouse of nutrients and a fantastic soil amendment. It improves soil structure, increases water retention in sandy soils, and enhances drainage in clay soils. It also introduces beneficial microbes that help plants absorb nutrients.
- How Much to Add? A general guideline is to add a layer of 2-4 inches of organic compost over the entire bed.
- Incorporating Compost: After spreading the compost, gently work it into the top 6-8 inches of your existing garden soil using a shovel, garden fork, or tiller. If you’re practicing no-till, simply spread it on top.
Other Beneficial Amendments
Based on your soil testing results, you might need to add other soil nutrients or amendments:
- Aged Manure: Well-rotted manure adds nitrogen, phosphorus, and potassium, along with organic matter. Ensure it’s fully composted to avoid burning plant roots.
- Worm Castings: A highly concentrated source of nutrients and beneficial microbes.
- Peat Moss or Coco Coir: These improve water retention and aeration, especially in clay soils. However, peat moss is a non-renewable resource, making coco coir a more sustainable alternative.
- Lime: If your soil pH is too low (acidic), lime will raise it. Add according to soil testing recommendations.
- Sulfur: If your soil pH is too high (alkaline), elemental sulfur will lower it.
- Compost Tea: A liquid fertilizer made by steeping compost in water. It’s a good way to provide a quick boost of nutrients and beneficial microbes.
Table 1: Common Soil Amendments and Their Benefits
| Amendment | Key Benefits | Best For | Application |
|---|---|---|---|
| Organic Compost | Improves soil structure, fertility, water retention, and aeration. | All soil types. | Spread 2-4 inches and incorporate into the top 6-8 inches. |
| Aged Manure | Adds nitrogen, phosphorus, potassium, and organic matter. | All soil types, especially for boosting fertility. | Spread 1-2 inches and incorporate. Ensure it’s fully composted. |
| Worm Castings | Rich in nutrients, beneficial microbes, and improves soil structure. | All soil types, excellent for seedlings and transplants. | Mix 10-20% into planting holes or top-dress around plants. |
| Coco Coir | Improves water retention and aeration, lightweight. | Clay soils (to improve drainage), sandy soils (to retain moisture). | Mix 20-30% into existing soil or use as a standalone potting mix component. |
| Lime | Raises soil pH, provides calcium and magnesium. | Acidic soils (pH < 6.0). | Apply as directed by soil test results. |
| Sulfur | Lowers soil pH, provides sulfur. | Alkaline soils (pH > 7.0). | Apply as directed by soil test results. |
Addressing Drainage Improvements
If your soil testing or observation revealed poor drainage, it’s time to act.
- Incorporate Organic Matter: As mentioned, generous amounts of organic compost and other organic materials are the first line of defense. They create pore spaces that allow excess water to drain away.
- Avoid Compaction: Stay off your garden beds when they are wet. Use designated pathways. If you are tilling garden beds, do so when the soil is at the right moisture level.
- Raised Beds: For persistent drainage issues, raised beds are an excellent solution. They allow you to create your own perfect soil mixture and elevate the planting area above the surrounding soggy ground.
- Benefits of Raised Beds: Improved drainage, warmer soil earlier in the spring, fewer weeds, easier access for planting and harvesting, and reduced soil compaction.
- Building Raised Beds: You can build them from wood (cedar or redwood are rot-resistant), stone, or metal. Fill them with a quality mix of garden soil, organic compost, and other amendments.
Preparing Soil for Specific Plants
Different plants have different needs. Tailor your preparation to what you plan to grow.
Vegetable Gardens
Most vegetables need fertile, well-draining soil rich in soil nutrients.
- Amendments: Generous amounts of organic compost are essential.
- Nutrients: A balanced organic fertilizer can be incorporated if soil testing indicates a need.
- pH: Aim for a pH of 6.0-7.0.
Flower Gardens
The preparation for flower gardens can vary greatly depending on the type of flowers.
- Perennials: Many perennials appreciate well-draining soil with good organic matter content.
- Annuals: Annuals often benefit from rich soil with plenty of nutrients to support their vigorous growth and bloom production.
- Acid-Loving Plants (e.g., Rhododendrons, Azaleas): These require acidic soil. Avoid adding lime, and consider incorporating peat moss or acidic mulch like pine needles. Soil testing is particularly important here.
Herbs
Many herbs prefer well-draining soil and don’t need overly rich conditions, which can sometimes dilute their flavor.
- Amendments: Incorporate some organic compost, but don’t overdo it.
- Drainage: Excellent drainage is key. Sandy loam is often ideal. Consider adding grit or perlite if your soil is heavy.
Final Touches Before Planting
Once your beds are prepped and amended, there are a few final steps to consider.
Raking and Leveling
After incorporating amendments, use a rake to smooth and level the surface of your beds. This creates a uniform planting surface and makes it easier to sow seeds or transplant seedlings evenly. Remove any large stones or debris that may have surfaced during the tilling garden process.
Mulching (Pre-emptive)
While often thought of as a summer task, a light layer of mulch applied in spring can be beneficial.
- Benefits: It helps retain moisture, suppresses early weeds, and can help regulate soil temperature, preventing rapid fluctuations.
- Materials: Shredded bark, straw, or compost are good choices.
Cover Crops
If you planted a cover crop like clover or rye over winter, it’s time to incorporate it into the soil.
- When to Cut: Cut cover crops down just before they go to seed and before they become too woody.
- Incorporation: You can either till them into the soil or leave them on the surface as a living mulch (in a no-till system). They add valuable organic matter and soil nutrients as they decompose.
Preparing Raised Beds
Raised beds offer a unique opportunity for soil preparation. Because you’re essentially creating a new soil environment, you have more control.
The “Lasagna” Method
This no-dig method involves layering different organic materials in your raised bed.
- Bottom Layer: Twigs, small branches, and coarse materials for drainage and aeration.
- Middle Layers: Layers of “greens” (nitrogen-rich, like grass clippings, kitchen scraps) and “browns” (carbon-rich, like shredded leaves, cardboard).
- Top Layer: A good amount of organic compost and high-quality garden soil.
Filling with a Mix
A common and effective mix for raised beds includes:
- 1/3 good quality garden soil
- 1/3 organic compost
- 1/3 aeration material (like coco coir, perlite, or coarse sand)
This provides excellent drainage, aeration, and a rich base of soil nutrients.
Frequently Asked Questions (FAQ)
Q1: When should I start preparing my garden beds for spring?
You can start preparing your garden beds as soon as the soil is workable, meaning it’s not frozen and not overly saturated with water. Late winter or early spring is ideal.
Q2: How do I know if my soil needs amendments?
The best way to know is through a soil testing. However, observing your soil’s texture, how it drains, and the past performance of your plants can also provide clues.
Q3: Can I just add fertilizer instead of compost?
While fertilizer provides essential soil nutrients, it doesn’t improve soil structure or add the beneficial organic matter that compost does. A combination of organic compost and targeted fertilizers (based on soil testing) is often best.
Q4: How deep should I work the soil when preparing beds?
Aim to work amendments into the top 6-8 inches of garden soil where most plant roots will develop.
Q5: What if I don’t have access to a lot of compost?
If you don’t have a lot of organic compost, focus on what you can get. Even a smaller amount worked into the soil will make a difference. You can also look for locally sourced compost or consider creating your own compost pile if you haven’t already.
Q6: Is it okay to till my garden every year?
While tilling garden beds annually can break up compaction, it can also degrade soil structure over time and harm beneficial organisms. Consider reducing the frequency of tilling or adopting no-till practices if possible.
By following these steps, you’ll ensure your garden beds are in prime condition to welcome the new growing season, setting the stage for abundant harvests and beautiful blooms. Happy gardening!