
Can you fix lawn furniture? Yes, you absolutely can! Restoring your outdoor furniture is a rewarding way to save money and bring your favorite patio pieces back to life. Whether it’s wobbly patio chairs, a sun-faded table, or ripped cushions, most lawn furniture issues are fixable with a little effort and the right approach. This guide will walk you through how to repair lawn furniture, mend patio chairs, fix wicker furniture, repair metal furniture, fix plastic furniture, refurbish outdoor seating, patch lawn chairs, mend patio tables, and reupholster outdoor cushions.
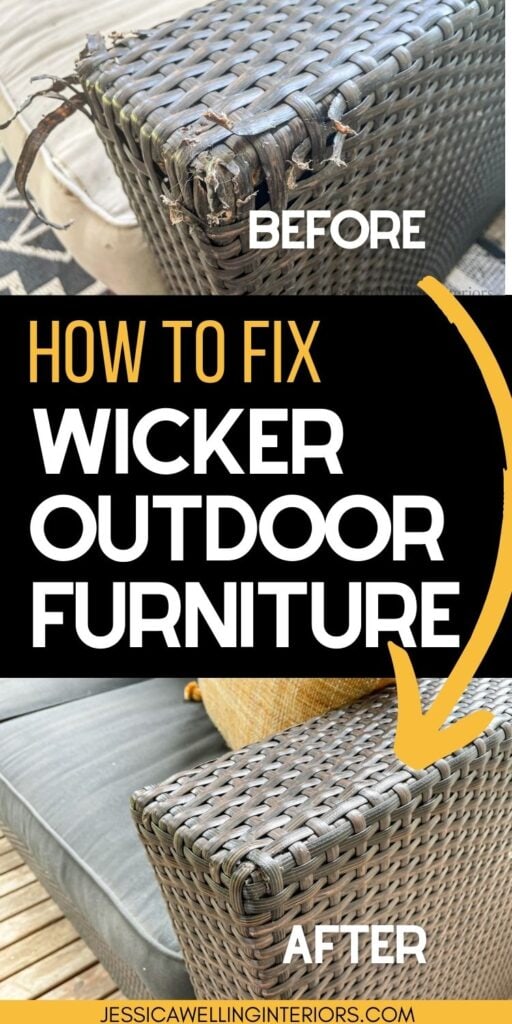
Image Source: jessicawellinginteriors.com
Reviving Your Outdoor Oasis: A Comprehensive Guide
Your lawn furniture is more than just a place to sit; it’s a gateway to enjoying the outdoors, hosting gatherings, and creating lasting memories. Over time, however, the elements can take their toll, leaving your beloved patio set looking tired and worn. But before you consider replacing it, know that many common problems can be addressed with simple repairs. This in-depth guide will equip you with the knowledge and techniques to bring your outdoor furniture back to its former glory. We’ll cover everything from basic cleaning to more involved repairs, ensuring your patio remains a welcoming and beautiful space.
Getting Started: Assessment and Preparation
Before diving into repairs, a thorough assessment of your outdoor furniture is crucial. This helps you identify the specific issues and plan your approach.
Assessing the Damage
Take a close look at each piece of furniture. What materials is it made from? What are the specific problems?
- Structural Integrity: Are there loose joints, wobbly legs, or cracked frames?
- Material Condition: Is the metal rusted? Is the plastic brittle? Is the wicker unraveling?
- Surface Issues: Are there scratches, dents, fading, or peeling paint?
- Cushion Wear: Are the cushions ripped, faded, stained, or moldy?
Gathering Your Supplies
Once you know what needs fixing, you can gather the necessary tools and materials. This will vary depending on the type of furniture and the repairs needed.
General Supplies:
- Gloves and eye protection
- Cleaning cloths and sponges
- Mild soap and water
- Hose or pressure washer (low setting)
- Sandpaper (various grits)
- Wire brush
- Screwdrivers and wrenches
- Putty knives
- Drop cloths or tarps
Material-Specific Supplies:
- Metal Furniture: Metal primer, outdoor metal paint, rust remover, metal filler, sandpaper for metal.
- Plastic Furniture: Plastic cleaner, plastic primer, outdoor plastic paint, plastic epoxy or glue.
- Wicker Furniture: Wicker repair kits, wood glue, rattan sealant, fine-grit sandpaper, small paintbrush.
- Wood Furniture (if applicable): Wood cleaner, wood filler, wood stain or paint, sealant, sandpaper.
- Cushions: Outdoor fabric, heavy-duty thread, sewing machine or needle, upholstery foam, zipper repair kit.
Repairing Different Materials
Let’s break down the common repair techniques for various lawn furniture materials.
Repairing Metal Furniture
Metal patio furniture is durable but susceptible to rust and structural damage.
Tackling Rust
Rust is the most common enemy of metal furniture.
- Remove Loose Rust: Use a wire brush or sandpaper to remove as much loose rust as possible.
- Apply Rust Remover: For stubborn rust, apply a commercial rust remover according to product instructions.
- Clean and Dry: Wipe the area clean with a damp cloth and allow it to dry completely.
- Prime: Apply a metal primer specifically designed for outdoor use. This creates a barrier against future rust.
- Paint: Apply several thin coats of outdoor metal paint, allowing each coat to dry thoroughly. Choose a paint that offers UV protection and weather resistance.
Fixing Loose Joints and Dents
- Loose Joints: If bolts are loose, tighten them. If holes have become stripped, you might need to drill a slightly larger hole and use a bigger bolt, or use wood filler or metal epoxy to fill the stripped hole before re-drilling.
- Dents: For minor dents, you might be able to gently tap them out from the inside. For more significant dents, metal filler can be used. Apply the filler, let it cure, sand it smooth, prime, and paint.
Table: Metal Furniture Repair Steps
| Problem | Solution | Tools/Materials Needed |
|---|---|---|
| Rust | Remove rust, apply rust remover, prime, paint. | Wire brush, sandpaper, rust remover, metal primer, outdoor metal paint. |
| Loose Joints | Tighten bolts or use larger bolts/epoxy for stripped holes. | Screwdriver, wrench, drill, larger bolts, metal epoxy. |
| Dents | Tap out minor dents; use metal filler for significant ones, then sand, prime, and paint. | Hammer (optional), metal filler, putty knife, sandpaper, metal primer, outdoor metal paint. |
| Cracked Metal | Clean the area, apply metal epoxy or weld (if skilled), sand smooth, prime, and paint. | Metal epoxy, sandpaper, metal primer, outdoor metal paint, (welder if experienced). |
Fixing Plastic Furniture
Plastic furniture is lightweight and weather-resistant, but can become brittle or cracked.
Cleaning and Restoring Faded Plastic
Fading is common with plastic left in the sun.
- Clean Thoroughly: Use a mild soap and water solution to wash the furniture. For stubborn dirt or mold, a diluted bleach solution (1 part bleach to 10 parts water) can be used, followed by rinsing.
- Restore Shine: Plastic restorers or automotive trim protectants can bring back some of the original color and shine. Apply with a clean cloth.
- Painting Plastic: For a more dramatic restoration, you can paint plastic furniture.
- Clean and degrease the surface thoroughly.
- Lightly sand the plastic with fine-grit sandpaper to create a surface for the paint to adhere to.
- Apply a plastic primer.
- Apply several light coats of outdoor plastic paint or spray paint designed for plastic.
Repairing Cracks and Breaks
Small cracks can often be mended with plastic epoxy or strong adhesive.
- Clean the Area: Ensure the cracked area is clean and dry.
- Apply Adhesive: Apply a strong plastic adhesive or epoxy to the crack, following the product’s instructions. Clamp the pieces together if possible while the adhesive cures.
- Reinforce (Optional): For structural cracks, you might be able to reinforce the repair from the underside with a piece of similar plastic secured with epoxy.
- Sand and Paint: Once cured, sand any rough edges smooth, prime, and paint the repaired area to match the rest of the furniture.
Repairing Wicker Furniture
Wicker, whether natural rattan or synthetic, can be delicate.
Mending Unraveling Wicker
Wicker strands can fray or break over time.
- Clean the Area: Gently clean the affected area with a soft brush and mild soap and water.
- Trim Loose Ends: Carefully trim away any frayed or loose ends.
- Apply Adhesive: Use a small amount of strong, clear-drying glue or wood glue to secure the ends of the wicker. A tiny paintbrush can help apply it precisely.
- Weave or Patch: For larger gaps, you might need to weave new wicker strands or use a wicker repair kit. Kits often contain pre-cut strands and adhesive.
- Seal: Once the adhesive is dry, apply a sealant or varnish designed for wicker to protect the repaired area.
Fixing Loose Frames
Loose frames in wicker furniture usually stem from the underlying wooden or metal structure.
- Identify the Loose Part: Determine if the frame itself is loose or if the wicker wrapping is detaching.
- Tighten Fasteners: If it’s a wooden or metal frame, tighten any visible screws or bolts.
- Use Wood Glue: For wooden frames, add wood glue to any loose joints and clamp them tightly until the glue dries.
- Reattach Wicker: If the wicker is coming away from the frame, use a strong adhesive to reattach it. You may need to use small nails or staples (carefully) to secure it while the glue dries, then remove them later.
Patching Lawn Chairs
Many lawn chairs have fabric that can tear or wear out.
Patching Fabric Tears
- Clean the Area: Wash the fabric around the tear and allow it to dry completely.
- Prepare a Patch: Cut a piece of durable, outdoor-suitable fabric slightly larger than the tear. If you can salvage fabric from an inconspicuous area (like the underside), that’s ideal. Alternatively, use a matching or contrasting outdoor fabric.
- Apply Adhesive or Sew:
- Fabric Glue: Apply a strong fabric glue to the edges of the tear and the patch. Press the patch firmly in place and allow it to cure.
- Sewing: Turn the chair over. Fold the edges of the tear inward and sew them together with a strong, outdoor-grade thread and a sewing machine or a heavy-duty needle. Then, place the patch over the repaired tear and sew it securely around the edges.
Replacing Fabric Sections
For larger tears or worn areas, you might need to replace entire sections of fabric. This often involves unpicking the old seams, cutting new fabric to size, and sewing the new fabric in place. This is essentially a simpler form of reupholstering.
Refurbishing Outdoor Seating and Tables
Beyond material-specific fixes, the overall appearance of your outdoor set can be dramatically improved.
Refurbishing Outdoor Seating
This involves addressing the frames and any cushions.
Cleaning and Protecting Frames
- Thorough Cleaning: Wash all surfaces with mild soap and water. For deep cleaning, use specialized outdoor furniture cleaners.
- Protective Coatings: Apply a sealant or protectant appropriate for the material (e.g., UV protectant for plastic, teak oil for wood, clear coat for painted metal) to guard against fading and damage.
Mending Patio Tables
Patio tables often face similar issues to chairs – structural instability and surface damage.
Repairing Damaged Tabletops
- Laminate or Tile: Chipped laminate or loose tiles can often be repaired with appropriate adhesives and fillers.
- Glass: Ensure the glass is securely seated. If a piece of glass is chipped or cracked, it’s usually best to replace it entirely with safety glass.
- Metal or Plastic: Follow the repair techniques outlined earlier for metal and plastic furniture.
Stabilizing Wobbly Tables
- Check Leveling Feet: Many tables have adjustable leveling feet. Ensure they are properly adjusted.
- Tighten Fasteners: Check all bolts, screws, and welds holding the table together and tighten them.
- Reinforce Legs: If legs are loose at the base or attachment point, add glue and possibly small brackets for reinforcement.
Reupholstering Outdoor Cushions
Worn-out cushions can make even the sturdiest furniture look unappealing. Reupholstering is a fantastic way to refresh your set.
Preparing the Old Cushions
- Remove Old Covers: Carefully unzip or unpick the old cushion covers. Keep them to use as patterns for your new covers.
- Inspect the Foam: Check the foam inserts. If they are moldy, flattened, or degraded, you’ll need to replace them. You can buy new outdoor-rated foam or repurpose foam from old indoor cushions (though outdoor foam is best for durability).
- Clean the Foam: If the foam is still in good condition, clean it gently with a mild soap solution and allow it to dry completely in the sun.
Creating New Cushion Covers
- Choose Outdoor Fabric: Select a fabric specifically designed for outdoor use. These fabrics are typically UV-resistant, water-repellent, and mildew-resistant. Acrylic or polyester blends are common choices.
- Cut Fabric: Lay your old cushion cover flat and use it as a pattern to cut your new fabric. Remember to add about ½ inch to ¾ inch seam allowance around all edges. If your cushions have piping or ties, account for those as well.
- Sewing the Covers:
- Zipper Insertion: If your cushion cover has a zipper, sew it into one of the seams before joining the main panels.
- Joining Panels: Place two fabric pieces right sides together and sew along the edges, leaving one edge open for the zipper or flap closure. Repeat for all panels.
- Adding Details: Sew on any piping or ties now.
- Turn and Insert: Turn the cover right side out. Insert the foam insert. Close the cover using the zipper or flap.
Alternative: Cushion Covers with Ties
If you don’t have a sewing machine or want a simpler solution, you can create cushion covers with ties. This involves cutting larger fabric pieces and sewing ties onto the corners or edges, allowing you to secure the cushion to the chair.
Table: Reupholstering Cushion Steps
| Step | Details |
|---|---|
| Remove Old Covers | Unzip or unpick old covers, keeping them as patterns. |
| Inspect Foam | Check foam for damage; replace if necessary. Clean existing foam and dry thoroughly. |
| Choose Fabric | Select durable outdoor fabric (UV-resistant, water-repellent). |
| Cut Fabric | Use old covers as patterns, adding seam allowance (½” – ¾”). |
| Sew Covers | Sew panels right sides together, leaving an opening for closure. Add piping or ties if desired. |
| Insert Foam & Close | Turn cover right side out, insert foam, and close with zipper or flap. |
Seasonal Care and Maintenance
Regular maintenance is key to extending the life of your lawn furniture and keeping it looking its best.
Spring Cleaning and Preparation
Before the season begins:
- Deep Clean: Wash all furniture thoroughly.
- Inspect for Damage: Check for rust, cracks, loose parts, or worn fabric.
- Tighten Hardware: Tighten any loose screws, bolts, or nuts.
- Apply Protectants: Reapply sealants or protectants as needed.
Summer Upkeep
During the summer months:
- Wipe Down: Regularly wipe down furniture to remove dust, pollen, and spills.
- Spot Clean Cushions: Address stains on cushions immediately.
- Check for Weeds: Remove any weeds growing around furniture bases.
Fall Storage
When the season ends:
- Clean Thoroughly: Give everything a good wash before storing.
- Dry Completely: Ensure all pieces are completely dry to prevent mold and mildew.
- Protect Cushions: Store cushions indoors in a dry, well-ventilated area.
- Cover or Store Furniture: Use furniture covers to protect your set from the elements, or store pieces in a garage, shed, or basement. If storing outdoors, elevate furniture off the ground to prevent moisture damage.
Frequently Asked Questions (FAQ)
Q1: What is the best way to remove rust from metal lawn furniture?
A1: The best way to remove rust is to first remove loose rust with a wire brush or sandpaper, then apply a commercial rust remover. After cleaning and drying, prime and paint the affected area with outdoor-rated metal primer and paint.
Q2: Can I paint plastic lawn furniture?
A2: Yes, you can paint plastic lawn furniture. It’s important to clean the surface thoroughly, lightly sand it to promote adhesion, use a plastic primer, and then apply several thin coats of outdoor-specific plastic spray paint.
Q3: How do I fix a wobbly patio chair?
A3: First, check if all bolts and screws are tight. If the legs are wobbly due to loose joints or stripped screw holes, you may need to use wood glue and clamps for wooden joints, or use epoxy to fill stripped holes before re-drilling.
Q4: What kind of fabric should I use to reupholster outdoor cushions?
A4: You should use fabrics specifically designed for outdoor use. Look for materials that are UV-resistant, water-repellent, and mildew-resistant, such as acrylics or treated polyesters.
Q5: My wicker furniture is unraveling. What can I do?
A5: For small unraveling sections, you can trim loose ends, apply a strong adhesive like wood glue to secure them, and then seal the area. For larger issues, consider a wicker repair kit or professional restoration.
Q6: How often should I reapply sealant to my furniture?
A6: This depends on your climate and the type of furniture. Generally, it’s a good idea to inspect and reapply sealants or protective coatings once a year, typically in the spring, or whenever the finish appears dull or worn.
Q7: What’s the best way to clean mold or mildew off outdoor cushions?
A7: A solution of 1 part bleach to 10 parts water is effective for killing mold and mildew. Apply it with a sponge or spray bottle, let it sit for a few minutes, then scrub gently and rinse thoroughly. Always test in an inconspicuous area first.
By following these steps, you can successfully repair lawn furniture and restore your entire outdoor set, enjoying your patio in comfort and style for many seasons to come.