
Can you find water lines in your yard before you dig? Yes, you can, and it’s crucial for safety and preventing costly damage. Locating water lines is a vital step before any excavation project, whether it’s for landscaping, fence installation, or home repairs. Ignoring this step can lead to accidents, expensive repairs, and even disruptions to your water supply. This guide will walk you through the process of identifying these buried assets.
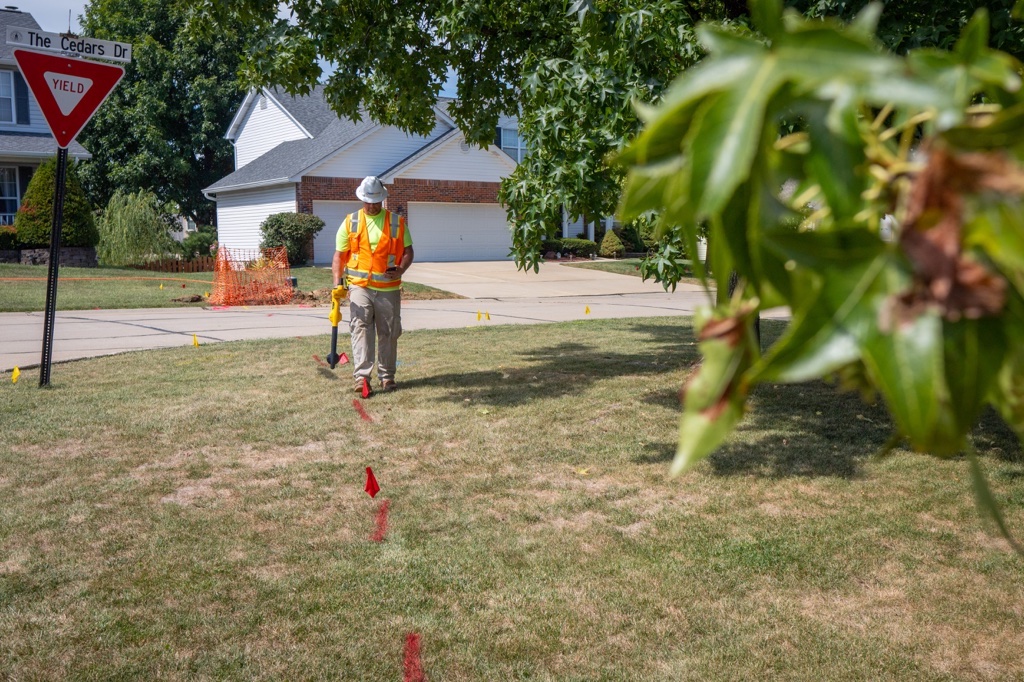
Image Source: utilisource.us
The Importance of Knowing What Lies Beneath
Digging into your yard without knowing what’s underground is like navigating a minefield blindfolded. There are numerous underground utility locating services that can assist, but understanding the basics yourself is empowering. Your property likely has a network of underground pipes carrying water, gas, electricity, and telecommunications. Hitting one of these can be dangerous and expensive.
Why Prioritize Water Line Location?
- Safety First: Water lines are connected to your main water supply. Damaging them can cause flooding, structural damage to your home, and even electrical hazards if near power lines.
- Prevent Costly Repairs: Repairing damaged water lines can cost hundreds or even thousands of dollars. This includes the cost of excavation, pipe replacement, and restoration of your yard.
- Avoid Service Interruptions: A broken water line can leave you without water for an extended period, impacting your daily life.
- Legal Responsibility: In many areas, you are legally responsible for any damage caused to underground utilities on your property.
First Steps: Calling for Professional Help
Before you grab a shovel, the most important first step is to call before you dig. This is not just a suggestion; it’s a legal requirement in most places.
The “Call Before You Dig” Process
Most regions have a centralized notification center that you can contact by dialing a specific three-digit number (often 811 in the United States). This service is free and essential.
What happens when you call?
- You provide information: You’ll need to give details about your planned excavation project, including the location and the type of work you’ll be doing.
- Utility companies are notified: The notification center will inform all utility companies that have underground infrastructure in your vicinity.
- Marking services are dispatched: Participating utility companies will send out their own locate service teams or use third-party contractors to mark the approximate location of their underground lines with flags or paint. This typically takes a few business days.
- Professional marking: These markings indicate the general area where utilities are believed to be. It’s important to remember that these marks are usually for public utilities, not necessarily private lines.
Understanding Public vs. Private Utilities
It’s crucial to distinguish between public and private utilities.
- Public Utilities: These are lines owned and maintained by the utility company, typically running from the street to your property line or the exterior of your home. These are what the 811 service marks.
- Private Utilities: These are lines that run from the property line to your house, or any other utilities installed by the homeowner (e.g., sprinkler systems, landscape lighting). The 811 service does not mark private lines.
Who is responsible for private lines? You, the homeowner, are responsible for locating and marking any private utilities on your property. This is where a private utility locator becomes invaluable.
DIY Methods for Locating Water Lines
While professional services are the safest bet, there are several methods you can employ to help pinpoint water lines on your property. These methods often complement the markings provided by utility companies.
Visual Clues and Property Records
Sometimes, the simplest clues are the most effective.
- Water Meter Location: Your water meter is often located near where the main water line enters your property from the street. This can provide a starting point.
- Outdoor Faucets and Spigots: The location of your outdoor faucets can give you an indication of where the water lines might be running underground.
- Previous Digging or Excavation: If there have been previous repairs or installations in your yard, there might be visible signs of disturbed soil or patches of different grass, hinting at past excavation.
- Property Surveys and Blueprints: If you have them, old property surveys, home blueprints, or even landscape plans might show the general path of underground utilities.
Using a Metal Detector
Metal detectors are designed to sense metallic objects buried underground. Since most water lines are made of metal (copper, steel, or ductile iron), a metal detector can be a useful tool.
How to use a metal detector:
- Choose the Right Detector: Look for a detector with good depth penetration and discrimination capabilities.
- Calibrate and Sweep: Follow the manufacturer’s instructions to calibrate your detector. Sweep the area systematically, moving slowly and covering overlapping sections.
- Listen for Signals: When the detector signals a metallic object, mark the spot.
- Pinpoint the Line: After identifying a potential location, try to sweep perpendicular to your initial sweep to help pinpoint the exact location and direction of the object.
- Confirm: Remember that metal detectors will also pick up other metallic objects, like old pipes, rebar, or even buried debris. Therefore, confirmation with other methods is recommended.
The Power of a Sonar Pipe Locator
For more precise plumbing location, a sonar pipe locator, also known as a pipe and cable locator or underground utility locator, is the professional standard. These devices use electromagnetic signals to trace the path of underground pipes and cables.
How a sonar pipe locator works:
A transmitter is attached to an accessible point of the pipe (like a cleanout or valve). This transmitter sends an electromagnetic signal along the pipe. A receiver is then used above ground to detect this signal.
Types of Sonar Pipe Locators:
- Induction: The transmitter generates a broad electromagnetic field that induces a current in metallic pipes. The receiver detects this induced current. This method works best on metallic pipes that are either directly connected to the transmitter or are large enough to pick up the induction field.
- Direct Connection: The transmitter is directly connected to the pipe using clips. This provides the strongest signal and is the most accurate method for locating metallic pipes.
Using a Sonar Pipe Locator:
- Access the Pipe: Find an accessible point of the water line, such as an outdoor spigot connection or a cleanout valve.
- Connect the Transmitter: Securely attach the transmitter to the water line.
- Power On and Set: Turn on the transmitter and receiver. Set the receiver to the appropriate frequency.
- Sweep the Area: Move the receiver over the ground, following the suspected path of the pipe. The receiver will emit a sound or display a reading that intensifies as you get closer to the pipe.
- Mark the Line: As you get a strong signal, mark the location on the ground. Continue sweeping to follow the pipe’s path and mark multiple points to confirm its trajectory.
- Depth Measurement: Many locators can also estimate the depth of the pipe.
Limitations: Sonar pipe locators are most effective on metallic pipes. They may not work well on plastic pipes unless a tracer wire is buried alongside the pipe.
Ground Penetrating Radar (GPR)
Ground Penetrating Radar (GPR) is another advanced subsurface investigation tool. GPR uses radar pulses to image the subsurface. It can detect a wide range of buried objects, including pipes, utilities, foundations, and anomalies.
How GPR works:
A GPR unit emits short electromagnetic pulses into the ground. When these pulses encounter a change in the subsurface material (like a pipe), some of the energy is reflected back to the receiver. The time it takes for the pulse to return indicates the depth of the object.
Advantages of GPR:
- Can locate non-metallic pipes (like PVC or PEX) if they have a noticeable contrast with the surrounding soil.
- Can detect various subsurface features, not just utilities.
- Provides a visual representation of the subsurface.
Disadvantages of GPR:
- Can be affected by soil conditions (high moisture or clay content can reduce penetration depth).
- Requires skilled operators for accurate interpretation of results.
- Can be more expensive than traditional locating methods.
Using a Drain Snake or Sewer Camera
For identifying the exact path and condition of your water lines, a drain snake equipped with a camera can be used, especially if you have access to a cleanout.
How to use a drain snake:
- Access the Water Line: Connect the drain snake to an accessible point of your water line.
- Insert the Camera: Slowly feed the snake into the pipe. The camera transmits live video to a monitor.
- Follow the Path: Watch the monitor as the camera travels through the pipe. You can see the pipe’s turns, bends, and any potential obstructions or damage.
- Locate by Depth: While the camera is inside, you can use a metal detector or an electromagnetic locator above ground to find the pipe’s location based on the signal from the camera head (if it’s metallic).
Excavation Safety: Best Practices
Once you have a good idea of where your water lines are, it’s time to discuss excavation safety. This is paramount to prevent accidents and damage.
Hand Digging vs. Mechanical Excavation
- Hand Digging: For shallow excavations or areas where utilities are known to be present, hand digging with shovels and trowels is the safest approach. This allows you to feel for any resistance, indicating you’ve hit something.
- Mechanical Excavation: If using machinery like backhoes or excavators, extreme caution is required. Only use mechanical equipment in areas far from known utility lines, or after careful subsurface investigation.
Hydro-Excavation: A Safer Alternative
Hydro-excavation, also known as vacuum excavation or soft digging, is a non-destructive excavation method that uses pressurized water and an air vacuum to remove soil.
Benefits of Hydro-Excavation:
- Precision: It allows for very precise digging around utilities.
- Safety: It significantly reduces the risk of damaging underground lines.
- Minimal Disruption: It leaves a cleaner, safer excavation site.
- Access: It can reach areas inaccessible to traditional excavation equipment.
If your project involves digging near known or suspected water lines, consider hydro-excavation as a safer alternative.
What to Do If You Accidentally Hit a Water Line
Despite your best efforts, accidents can happen. If you strike a water line:
- Stop Digging Immediately: Cease all excavation activity.
- Turn Off the Water: Locate the main water shut-off valve for your property and close it to minimize water damage. This is usually found near your water meter or where the service line enters your home.
- Assess the Damage: Carefully examine the extent of the damage to the water line.
- Call for Professional Help: Contact a qualified plumber immediately to repair the line. Inform them that you’ve hit a water line.
- Notify Utility Companies: If you damaged a public utility line, you should also notify the relevant utility company.
Frequently Asked Questions (FAQ)
How deep are water lines typically buried?
The depth of water lines can vary greatly depending on your location, local building codes, and the type of soil. In colder climates, they are typically buried below the frost line (often 3-6 feet deep). In warmer climates, they might be shallower, but are generally buried at least 18-36 inches deep to protect them from surface activities and temperature fluctuations.
Can I locate plastic water lines?
Locating plastic water lines (like PVC or PEX) is more challenging as they are non-metallic and do not conduct electromagnetic signals. If a plastic water line was installed with a tracer wire (a thin, insulated metal wire running alongside it), then a sonar pipe locator can be used to trace the tracer wire. Without a tracer wire, you might need to rely on GPR or careful observation of excavation.
How accurate are utility locating services?
Professional utility locating services are generally very accurate, but it’s important to remember that they mark the approximate location of utilities. The markings indicate the general path and a safe zone around the utility. Always exercise caution and use hand-digging techniques within a certain distance (often 18-24 inches) of any marked utility.
What is the difference between a pipe locator and a metal detector?
A metal detector is a general-purpose tool that detects any metallic object, regardless of whether it’s a utility line, buried scrap metal, or something else. A sonar pipe locator is specifically designed to trace the path and depth of underground pipes and cables by using electromagnetic signals. While a metal detector can sometimes help, a pipe locator is much more effective and precise for utility locating.
How long does it take for utility companies to mark my lines after I call?
Typically, utility companies have a legal timeframe (often 2-5 business days) to respond after you submit a call before you dig request. It’s essential to plan your excavation accordingly.
What if there’s no response from a utility company?
If you haven’t seen any markings after the specified timeframe, or if you suspect utilities are present but haven’t been marked, contact the call before you dig center to inquire. Never assume that an area is clear of utilities.
By following these guidelines and understanding the importance of underground utility locating, you can significantly reduce the risks associated with digging in your yard, ensuring your safety and protecting valuable infrastructure. Remember, when in doubt, always call a professional private utility locator for a thorough subsurface investigation.